
Welcome to the start of your Journey!

Thankyou for choosing Your Future Set!
Table of Contents
This is an important step in your journey, and we are here to guide you through every part of the process.
While we trust what you’ve told us, we do need to verify your documents to make sure everything’s complete and accurate before presenting it to the bank. This helps keep things running smoothly and gets you one step closer to approval.
We’ve put together this handy couple of pages to make the process easier for you. If you have any questions at all, don’t hesitate to reach out. Mike’s here to support and explain everything along the way – just drop a message at
[email protected].
Feel free to head over to the scroll through where you’ll find a simple list of guidelines to follow.
Thankyou for choosing Your Future Set
All the best you’ve got this!
Mike Mackenzie
Documents required
It’s really important that we have all your key documents right from the start. These documents give us a clear snapshot of your financial health, which is crucial for figuring out how much you can borrow and finding the best loan options for you.
Even the less critical documents can come in handy, as they might contain details that help us secure better terms for your loan, or simply speed up the whole process. We encourage you to fill out and provide as much information as you can. This will not only speed things up but also help us tailor the perfect financing solution for you.
Gathering everything might seem like a bit of a hassle, but it’s worth it to make your financing journey as smooth and fast as possible.
Why do I need to provide the critical documents?
Why do I need to provide the critical documents?
At Your Future Set, we need these critical documents to perform a preliminary serviceability calculation. This helps us determine if moving forward with the full document collection will be beneficial for you.
Why do I need to provide the non-critical documents?
The critical documents allow us to assess your eligibility, but the non-critical documents are essential for a thorough verification process. They help us ensure your situation aligns with the lender’s policies and allow us to confirm to the bank that we’re working in your best interest.
At Your Future Set, we adhere to a “Best Interest Duty” (BID), meaning we carefully review a range of over 40 lenders to find the best possible solution for you—something banks don’t do, as they can only offer their own products.
For more assistance gathering documents
See the following pages.
Using VEVO
Navigating Vevo
Step 1. Access VEVO
Step 2. Have your travel document and reference number ready
To see your visa details and conditions you will need information from a travel document such as your passport or ImmiCard. You will also need one of the following:
- Transaction reference number (TRN)
- Visa grant number
- Visa evidence number.
Transaction Reference Number (TRN)
You will have a TRN if you applied for your visa online. If you do not remember the number you can look it up on your ImmiAccount under the ‘online lodgement summary’ screen.
Visa grant number
You will find your visa grant number on your visa grant notification letter which you may have received by mail or email.
Important: The visa grant number in your grant notification may relate to a visa that is not ‘in-effect’. You will only be able to access your visa details when you use the grant number of your current visa.
For information on accessing your visa grant number visit the VEVO Request for Reference Number Form.
Visa evidence number
You may have a visa evidence number if you have a visa label attached to your passport. Not all passports have a visa label.
Step 3. Select 'Check your own visa details with VEVO'
The visa holder enquiry screen will display.
Step 4. Select the type of travel document
VEVO accepts the following documents:
- Passport
- ImmiCard
- Convention travel document – also known as a Titre de Voyage document for travel to Australia (DFTTA)
- PLO56 evidence card.
Step 5. Enter your reference number
In the ‘Reference type’ field choose one of the following:
- Transaction reference number (TRN)
- Visa grant number
- Visa evidence number
- VEVO password (if you have been assigned a password).
You can then type in the number.
Step 6. Enter your personal information
Enter your date of birth.
Step 7. Enter your travel document number
When entering your travel document number, check that the details you entered are correct. Ensure that you have not entered a capital O instead of a zero, or a capital I instead of the number one.
Step 8. Enter your country of document
If you are using a Titre de Voyage you need to enter the ‘country’ as the ‘nationality’ shown in the Titre de Voyage.
If you use your ImmiCard you will not need to select a country.
Step 9. Submit the information
Click the box to accept VEVO terms and conditions.
Select Submit
Emaling your visa details from VEVO
You can use VEVO to email your visa details to another person, such as an employer, a landlord or the government of a country you would like to visit.
Use the Vevo Website
Step 1. Access your details
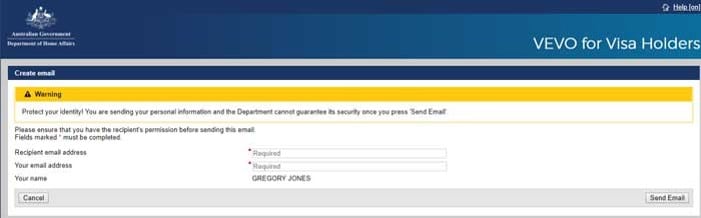
Step 2. Select 'Send Email'
Step 3. Prepare and send email
- Enter the email address of the person you want to receive your email in the ‘Recipient email address’ field
- Enter your email address in the ‘Your email address’ field
- Once your information is correct, select ‘Send Email’
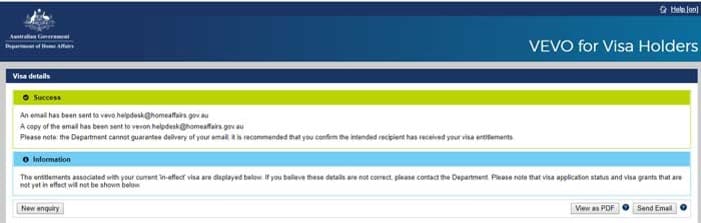
A new message will appear on the ‘visa details’ screen to show that your email has been sent.
Use the myVEVO app
You can also view your visa details and conditions and email this information directly to employers and other organisations using the myVEVO app on your phone.
Step 1. Download myVEVO
You can download the myVEVO app for free from the Apple App Store or Google Play.
Step 2. Create a personal identification number (PIN)
Your personal identification number (PIN) becomes your secure code to quickly access your visa details through the myVEVO app in future. If you enter the pin incorrectly on the app three times, it will ask you to set a new pin.
You will also be given the option to set up Touch ID or Face ID to access myVEVO.
Step 3. Have your Travel Document ready
From the ‘document type’ drop-down menu select Passport, ImmiCard, Document for Travel to Australia (DFTTA) or Titre de Voyage.
Step 4. Enter your personal information
Enter your:
- Visa grant number or transaction reference number
Date of birth.
Step 5. Enter your travel document details
Enter your:
- Passport, ImmiCard, DFTTA or Titre de Voyage number
- Country of document.
When entering your travel document number, check that the details you entered are correct. Ensure that you have not entered a capital O instead of a zero, or a capital I instead of the number one.
If you are using a Titre de Voyage you need to enter the ‘country’ as the ‘nationality’ shown in the Titre de Voyage.
If you use your ImmiCard you will not need to select a country.
Step 6. Accept terms and conditions
Step 7. Submit the information
For more assistance gathering documents
See the following pages.